Orc is a fictional creature, but by no means pleasant. Why it made the manufacturer choose such an inappropriate name for a rather cute case, we still don't understand. Although we do have a certain logical chain: "barbarian" and "gryphon" have already been with us, it's time to meet other characters.

By the way, this trio is united by a clear design accent, which consists of a transparent front panel with glowing fans. And Vinga Orc is the most interesting variation among them. What makes it remarkable, how to use the included remote control, and other useful information you will learn from this material.
Specification
|
Model |
Vinga Orc |
|||
|
Case Size |
Middle Tower |
|||
|
Motherboard Form Factor Support |
ATX / microATX / Mini-ITX |
|||
|
Color |
Black |
|||
|
Bays |
External |
None |
||
|
Internal |
2 x 3.5” 3 x 2.5” |
|||
|
Expansion Slots |
7 |
|||
|
Maximum GPU Length (in brackets - own measurements) |
350 mm (350 mm) |
|||
|
Maximum CPU Cooler Height (in brackets - own measurements) |
- (164 mm) |
|||
|
Ports |
1 x USB 3.0 2 x USB 2.0 2 x audio ports |
|||
|
Pre-installed Fans |
Front Panel |
3 x 120-mm |
||
|
Top Panel |
2 x 120-mm |
|||
|
Fan Mounting Options |
Front Panel |
3 x 140-mm / 3 x 120-mm |
||
|
Top Panel |
2 x 140-mm / 2 x 120-mm |
|||
|
Rear Panel |
1 x 120-mm |
|||
|
Tunnel |
1 x 120-mm |
|||
|
Power Supply |
None |
|||
|
Materials |
Front Panel |
4 mm thick glass with plastic trim |
||
|
Chassis |
0.51-0.55 mm thick steel |
|||
|
Right Side Panel |
0.55 mm thick steel |
|||
|
Left Side Panel |
2.9 mm thick acrylic |
|||
|
Case Dimensions (in brackets - own measurements) |
450 x 192 x 420 mm (450 x 201 x 410 mm) |
|||
|
Weight |
4.62 kg |
|||
|
Manufacturer's Website |
||||
Packaging and Delivery Set

The monochrome box made of simple cardboard bears the image of the device and a short specification table. Unfortunately, you'll have to cut out handles for transportation yourself.

In addition to the usual stands and screws, the novelty comes with a fan hub with a power cable and a remote control for it. How all this looks and works - we will definitely tell you later, but let's start, perhaps, with more familiar aspects.
Appearance
The tinted glass about 4 mm thick occupies almost the entire front panel of the Vinga Orc - even flagship smartphones and tablets would envy such slender frames. Through the darkness, you can slightly see the three included 120-mm fans, which receive fresh air through quite generous side perforations. And of course, there's the logo, adding that necessary zest to the front side. And yes, external devices in 5.25 and 3.5-inch formats cannot be installed here. Although our regular readers are probably already accustomed to this arrangement, aren't they?
The back greets us with black matte paint, which, nevertheless, is unable to hide some metal defects. It's no secret that this is where the manufacturer saves - the chassis thickness is only 0.51 mm, as stated on the official website. All fair and square.
The top 120-mm fan with height adjustment, seven expansion slots with six one-time plugs, and a common plate for fixation, as well as the bottom PSU location - we have a quite familiar set for Vinga cases.
The top panel also follows the best traditions of the genre. A dust filter with magnetic attachment covers the mounting spots for two 140- or 120-mm fans. By the way, a pair of smaller solutions is already pre-installed here, neighboring the interface panel. The plastic insert accommodates three fairly tightly placed USB ports (one version 3.0 and a pair of revision 2.0), two audio interfaces, as many buttons, and LED indicators in blue and red. Perhaps the only "but" of such placement is that cleaning dust from them will be challenging.
Another dust filter traditionally found its place on the bottom panel of the Vinga Orc, cleaning the air for the power supply unit. The 16 mm high feet cannot be called tall, so it's best to refrain from placing the system unit on a shaggy carpet. Moreover, the soft pads will help preserve the desk or any other surface from scratches.
The right side panel is a typical sheet of steel with a thickness of 0.55 mm with perimeter stiffening ribs. Any extraordinary elements are completely absent here, and the mounting is done in the usual way at the back of the case using a pair of thumbscrews.
The left side panel is more interesting. It is a tinted acrylic panel (435 x 375 mm) with a thickness of almost 3 mm, which will allow you to admire the components illuminated by the fans. And if the motherboard, graphics card, memory modules, CPU cooler, or any other internal elements also have LED illumination, then it will be hard to take your eyes off the "Orc." But more on that later.
In the meantime, let's note the good practicality of the metal surfaces and plastic elements, which will hide accidentally left fingerprints. However, the same cannot be said about acrylic and glass.
Internal Structure

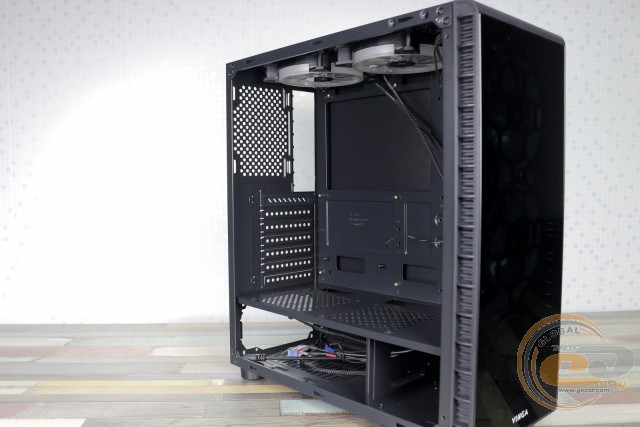
Although we have the usual layout with the power supply unit and hard drives at the bottom, the absence of a wall exposes these components to general view. Otherwise, nothing special: space for an ATX or smaller board, a large cutout for replacing a large CPU cooler, and smaller holes for some cable management.
The front part of the chassis is a solid set of mounting spots for fans: a trio of installed 120-mm or as many 140-mm solutions. Since the manufacturer does not provide additional information about the included accessories, we most likely have simple sleeve-bearing solutions. Not as reliable as beautiful - those are the priorities. The rotation speed is constant and is 1200 RPM - for 120-mm models, this is a very quiet mode. Mounting the fans requires removing the front panel, which is attached to the chassis with 4 pairs of plastic stands.
There are spots for a pair of SSDs on the tray near the front panel, and mounting them will require removing both side panels. Another solid-state drive can be placed at the bottom, under the larger 3.5" hard drives, although this mounting spot is not mentioned on the manufacturer's website for some reason.
To mount classic hard drives, use the stand between the power supply unit and the front panel. In this case, you will have to screw guide screws into the drives from one side, while from the other side (the PSU side), they are fixed to the case.
By the way, about the power source. The manufacturer completely forgot about any anti-vibration pads, but there's nothing else to complain about. There's more than enough space for the power supply unit: about 240 mm of space is available for its installation, which, if desired, allows for the use of even 200-mm solutions, and still leaves 40 mm for cable management. However, don't forget that a long power source may block access to the screws for the hard drives, and removing and inserting the PSU every time you replace an HDD is not very fun.
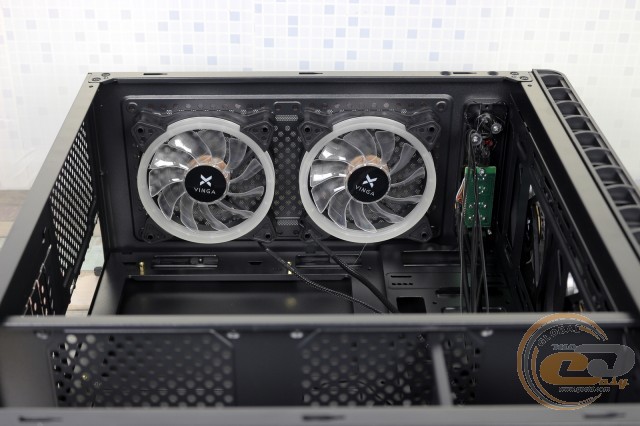
The fans located under the top panel are exactly the same as those on the front. Theoretically, radiators for liquid cooling systems could fit both there and in the front, but in practice, there is no thickness allowance for their installation.
All expansion slot covers, except for the top one, are single-use - a typical budget approach. The spot for the rear fan is empty - indeed, a pair of fans at the top should be quite sufficient.
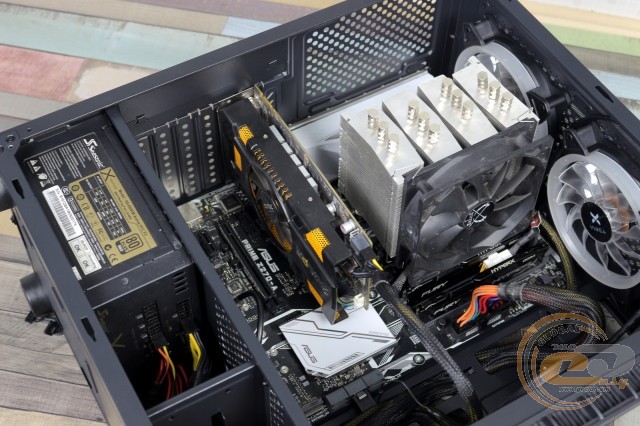
The abundance of free space is a clear plus for any case. Firstly, the assembly process in this case brings more pleasure than nervousness. Secondly, the choice of suitable components is almost not limited by the case, but only by your desire and wallet. For example, the tested novelty can accommodate a 350-mm graphics card, meaning most modifications on the market, even top solutions. And for those who want to play with CPU overclocking, compatibility with 164-mm coolers will allow you to choose a model to your taste.
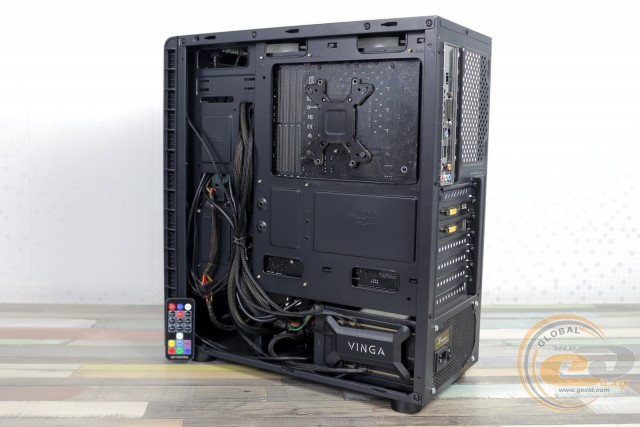
The free space behind the tray will help tidy up the wires, but it won't be possible to completely hide the power source.
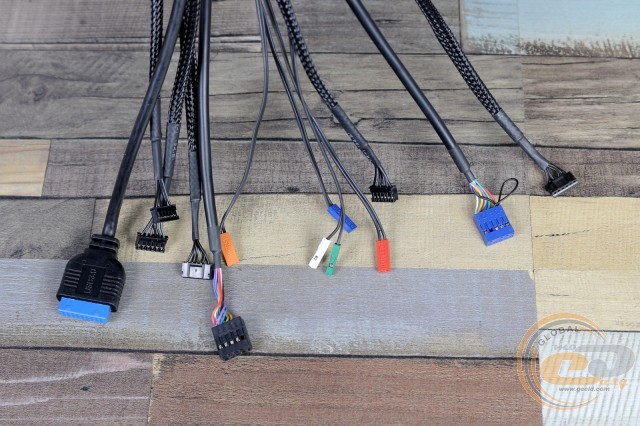
The cables coming from the front panel are long, and the holes in the tray and tunnel will allow them to be routed to the motherboard less noticeably.
|
Name |
Length, cm |
|
USB 3.0 |
70 |
|
USB 2.0 |
60 |
|
HD Audio |
60 |
|
Buttons and Indicators |
55 |
|
From Fans |
60 |
Let's recall that the case comes with a hub board with magnetic attachment and a remote control, all in a very beautiful package. Whether to place it on the external panel or inside is up to the happy owner. In general, the hub can connect eight fans with 6-pin connectors (the included fans are equipped with these) and another pair of LED strips with 4-pin connectors. The board and connected devices are powered via a PATA connector.


Now about the remote. The infrared indicator does an excellent job of transmitting the signal up to 5 m, and there is no particular need for precise direction. Yes, and 19 buttons are not just 2, although that has happened too. It is logical to assume that there will be many possible options. In addition to a separate button for turning on each of the colors (red, green, blue, yellow, turquoise, purple, white), you can change display modes, switching speed, or give your eyes a rest. However, disabling individual fans or controlling their operation is not provided here.
To ensure that such an important control element is not lost on the desktop, it is equipped with a magnet on the back panel, so for convenience, it can be attached directly to the metal parts of the case.
The lighting looks impressive - 5 LEDs, after all, do their job. With it, the case looks quite complete, so there is no particular sense in adding fans or LED strips.
Testing
|
Processor |
Intel Core i7-7700K (Socket LGA1151, 4.2 GHz, L3 8 MB) |
|
Cooler |
Scythe Mugen 3 |
|
Motherboard |
ASUS PRIME Z270-A (Socket LGA1151) |
|
RAM |
2 x 8 GB DDR4-2400 HyperX Fury HX424C15FBK2/16 |
|
Graphics Card |
ASUS GeForce GTX 980 MATRIX PLATINUM 4GB GDDR5 |
|
Storage |
SSD KINGMAX SME35 Xvalue |
|
Power Supply |
Seasonic X-560 Gold (SS-560KM Active PFC, ATX, 560W) |
|
Thermal Paste |
Noctua NT-H1 |

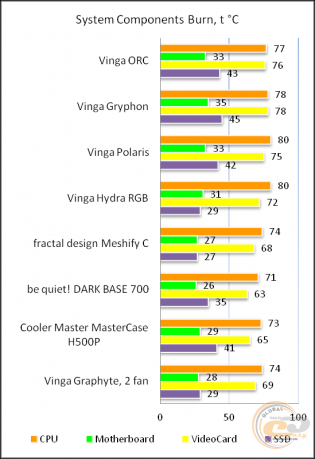
The "All System Load" chart shows the heating of components after 30 minutes of 3DMark Fire Strike in Ultra mode (4K resolution). The "System Component Burn" mode demonstrates temperatures under load with AIDA64 applications (Stress CPU and FPU) and MSI Kombustor for 15 minutes. The case was tested with five pre-installed fans.
The obtained temperature readings are quite typical for a Vinga case with an emphasis on "transparent" design. A couple of degrees compared to the same Vinga Gryphon were gained by the front perforation, but nothing more. This does not mean that the components will suffocate in it - five fans will not allow this. Just be prepared for the CPU to heat up a few degrees, and the graphics card possibly by a whole ten degrees more than in solutions with generously perforated panels. However, if you have modern and/or energy-efficient components installed, then the difference in their heating will be minimal.
Conclusions
No, after all, the tested Vinga Orc case has nothing in common with a literal orc. In many ways, it repeats the features of other branded solutions: a glass front panel, an acrylic side, a multitude of installed fans with lighting, plenty of space for installing large graphics cards and a CPU cooler. Of course, with such a list of options, the novelty goes beyond the budget category and requires about $70 from the buyer.
In addition to the above, a truly original feature of the "Orc" is the remote control designed for lighting. There aren't many colors and modes, but the novelty will definitely please the eyes. If the lighting becomes annoying, it can be turned off, and if desired, the included hub will allow you to connect a few more fans for an even greater wow effect. That's if the included five are not enough for you.
As for the temperature of the internal components, it fully corresponds to the design. The emphasis on glass and acrylic did its job, but there is no need to talk about any overheating, especially if you are using modern energy-efficient components. Therefore, if the appearance and price of the Vinga Orc suit you, then the novelty can be considered for purchase.
Advantages:
- memorable front panel design;
- left side made of transparent acrylic plastic;
- good build quality;
- support for 350-mm graphics cards and 164-mm CPU coolers;
- possibility to mount up to six fans;
- presence of five installed fans with LED lighting;
- presence of a complete hub with a convenient remote control for fan lighting management;
- possibility to install two 3.5" and three 2.5" drives;
- presence of dust filters on the bottom and top panel;
- use of soft feet on the case;
- possibility of hidden cable management.
Disadvantages:
- weak air circulation inside the case;
- lack of vibration-damping pads in the PSU and hard drive installation areas.
Author: Oles Paholok
Translation: Liliya Masyuk
We express our gratitude to the companies ASUS, Intel, Noctua, Sea Sonic Electronics and the brand HyperX for providing equipment for the test stand.